
Quick Rips: Volume 7
This was a fun one. Starting with a power circuit, then moving into 2 more technical full body circuits - a nice contrast. Here’s the breakdown:
3 Circuits
3 Rounds Each
4-6 reps each in Circuit 1
6-8 SLOW reps in Circuits 2 and 3
Moderate weight
Minimal Rest
Circuit 1
Rotational Power / Saggital Power / Rotational Power

Rotational Shot Put
Power comes from the trailing hip. Push through the outside of your back foot, driving your hips to the wall. Finish by pushing your palm through the center of the ball.
Should feel: trailing glute, core, chest/shoulder

Single Leg Overhead Med Ball Pop
With a soft standing knee and tight core, throw the ball at the wall and try catching it stiff - pause for a second to test your balance and core stability.
Should feel: Lats, Hip (standing side), core

Single Leg Rotational Box Jump w/ Bilateral Landing
Rotate into the loaded hip at an angle, feeling your glute and hamstring stretch. Drive through the floor, at an angle, through the outside of your foot to rotate 90 degrees. Lands softly on two feet. Aim for air time, not a high box
Should feel: Glute + Hamstring on loaded leg
Circuit 2
Lower Pull / Upper Push / Anti-Extension Core (abs)

Wall SLDL
A creation of my own. The goal is to be the perfect distance from the wall where you can reach it with a nearly straight leg and without actually leaning on the wall. Standing leg is doing all the work, the reach helps you get deeper into the hip. Maintain good posture as you reach, and once you’re at the wall, pause and close your hip (rotate the unloaded side towards the loaded side).
Should feel: Glute, hamstring, core, upper back

Half Kneeling Bottoms Up Kettlebell press
A tough on on the shoulder, and a self-correcting exercise. Balance the KB from your shoulder not your hand by aiming to keep the pointy part of your elbow right under the KB handle.
Should feel: Shoulder, and a stretch in the arm pit at the top.

Overhead ISO hold Double Leg Dead Bug
Overhead holding tests your posture. Keep arms straight and the weight as far away from you as possible. With a flat back, slowly dip both heels to the ground while keeping your core tight to avoid an arch in your lower back.
Should feel: abs
Circuit 3
Lower Push / Upper Pull / Anti-Extension Core (abs)

Overhead Reverse Lunge
Posture + Strength. Reach up high with a straight arm, keep your core tight by trying to keep your ribs down. Front leg should be doing most of the work, by pressing through your heel and keeping your knee over your ankle.
Should feel: Glute, quad, shoulder, upper back, core

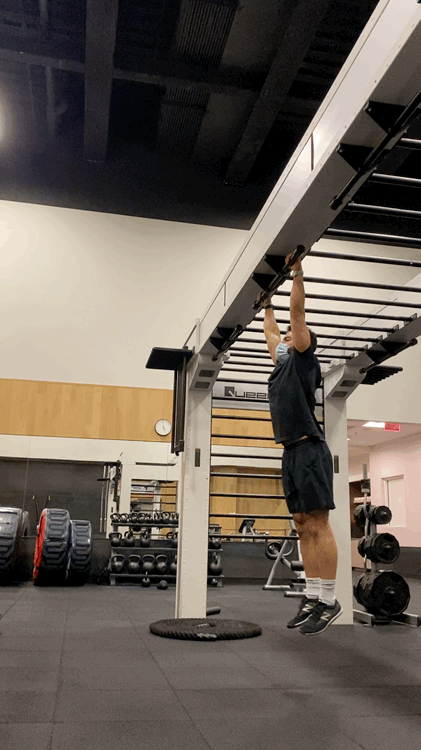
Pull Up
All the way up, all the way down. Avoid shrugging your shoulders at the top - if you can’t, reduce your range on the way up and only go as far as you can keep your shoulders away from your ears.
Should feel: Lat, upper back, arms
Toes to Bar
Tough one for your core. Most of the time will have to swing/use momentum to get up, but tempo the way down. That’s how you’ll build the strength to control both directions.
Should feel: Abs, arms/lats